# Bulk Importing and Exporing
# Importing
Elevator can perform bulk imports using standard CSV files. If those CSV files include URLs for digital assets, Elevator can automatically ingest those as well.
We strongly recommend starting with a small sample, consisting of only a couple records.
Bulk importing is only available to instance administrators. The import functionality is found under the “admin” menu.
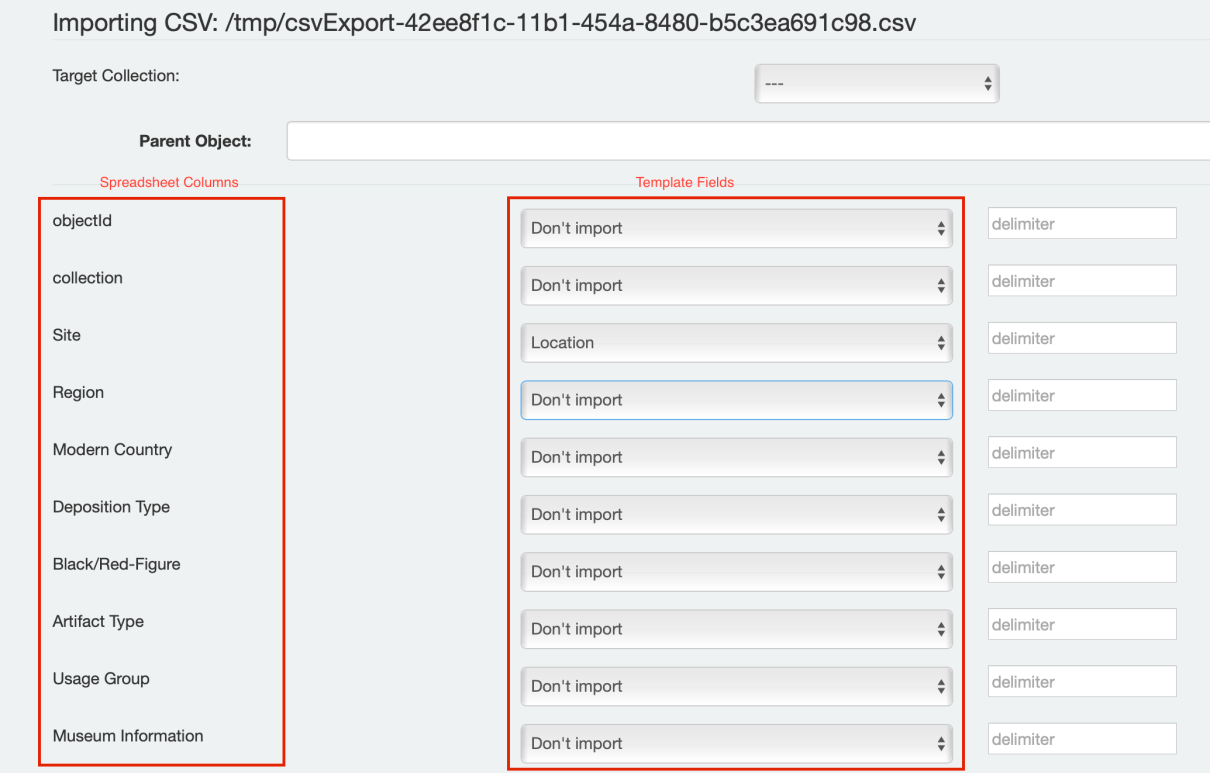
Importing from a CSV is a two step process. After selecting “Import from CSV”, you’ll be prompted to select the CSV file from your computer. You’ll also need to select the template to use target in Elevator.
After clicking “upload” you’ll be prompted to select your target collection. The “parent object” field can be used to bulk populated “related assets” within a single record. This is considered advanced functionality, and we’d recommend consulting with Elevator support before using this feature.
Next, you’ll need to map the columns from your CSV to the fields in your template. Elevator will try to assist by automatically mapping fields with matching names. For example, if your CSV has a column named “Title” and your template has a field named “Title”, those will be selected automatically. Otherwise, you’ll need to manually select the destination template field for each column from your source file.
If your source CSV has multiple entries per field, you’ll need to add the delimiter as well. For example, if your source CSV has three entries for title, delimited by a pipe (“Title1|Title2|Title3”) you’d need to add the pipe to the delimiter field.
URLs in your CSV must be publicly accessible via the web. If you’re familiar with tools like “curl” or “wget”, those are a good way to test that your URL is actually accessible. Elevator supports username/password values in the URLs, in the standard http://username:password@webhost format.
When you’ve done all of your field mapping, click “import”. Elevator will build a record for each row from your CSV, and provide a link to the asset.
# Data Formatting
Elevator makes certain assumptions about the way values are formatted.
# Date Fields
Elevator uses PHP’s strtotime function to try to parse English-language dates. The most reliable way to import a date will be to format it as YYYY/MM/DD. If you include a – between two dates, Elevator will treat that as a date range.
# Location Fields
Location fields should be of the form latitude,longitude,label (label being optional) and should be in decimal degrees.
# Checkbox Fields
CheckBox fields can either be blank or “off” for unchecked. Any other value is treated as true.
# Upload Fields
An upload field can either be just a basic URL (accessible via the web) or a compound field with additional information separated by commas. The structure as:
url,description,caption-vtt-url,chapter-vtt-url
The caption and chapter urls are only relevant for audio and video files, and should point to web accessible URLs hosting VTT files. These will be added as sidecar data when the core asset is ingested. The description field can be populated for any file. As long as you're using proper CSV encoding (with double quotes around text containing commas, etc) there should not be any additional restrictions on characters used in the description.
# Exporting to CSV
Elevator can export sets of documents to the standard CSV format. Each CSV file can only contain documents from a single template.
To export your documents to a CSV, begin by conducting a search for the set of records you wish to export. Then select “export to CSV” from the Admin menu. The SearchId field will automatically populate with a link to the search you just conducted. Select the template you wish to export and click the export button.
Elevator can only export 10,000 records to a CSV. If you need a larger export, please contact us.
Please note – Microsoft Excel can struggle when opening CSV files with large blocks of formatted text. If you encounter problems, considering using a tool like Apple Numbers or Google Sheets.